
Since Github is being purchased by Microsoft, I thought this would be a good time to finally get around to setting up my own personal, self-hosted git server. To this end, I ended up creating a Gitea server and am very pleased with the results, so I decided to make a guide so that others could quickly get up and running with a fully functioning Gitea server as well.
Table of Contents
- Why Gitea
- About This Guide
- Setting up Ubuntu Server
- Setting up PostgreSQL
- Installing and Configuring Gitea
- Setting up a Systemd Service
- Setting up Nginx
- Setting up Fail2ban
- Enabling HTTPS using Let's Encrypt
- Setting Automatic Certificate Renewal
- Enabling Git Over SSH
Why Gitea
The two main self-hosted git services I looked into when undertaking this task were GitLab and Gitea.
The obvious choice that most people seem to be flocking to appears to be GitLab. Upon evaluating GitLab I found it's interface to be a bit clunky, but the real deal breaker for me was the fact that a base install of GitLab recommends 4 whole gigabytes of RAM. This probably isn't a huge deal if you are running this instance for an organization, but as a personal git service, requiring 4GB of RAM significantly increases the cost of a cloud VM. I'm not trying to say there is anything wrong with GitLab, it's a great piece of software, but didn't quite meet my needs.
The other option that I found occasionally mentioned recently in Reddit and Hacker News threads, was Gitea. Upon initial inspection, I was delighted to find that I could simply download and run a single binary to start the server. I found the interface to be a very clean (albeit shameful clone of Github's), and that it contains a rather large feature set including all of the features that I need. Gitea is also very lightweight requiring minimal resources to run. I found that the process was only using about 25MB of RAM with a handful of repositories.
About This Guide
First of all I'll mention that this guide is a bit opinionated and I'm going to walk through the setup I performed using the choices I made (ex. PostgreSQL, AWS). I'll try to call out when alternatives exist at each step.
At the end of this guide if followed fully, we should have a Gitea instance that:
- is running as a Systemd service on Ubuntu
- is powered by PostgreSQL
- is running behind an Nginx reverse proxy
- supports HTTPS (with automatic certificate renewal)
- suports Git+SSH
- limits login attempts using Fail2ban
Not all of these are required for a working Gitea server, but nevertheless I feel that each makes the resulting Gitea server more robust.
Setting up Ubuntu Server
I've chosen to run my Gitea server on an AWS instance. I run most of my servers on AWS and have by far the most experience with this cloud provider. You can easily run Gitea on a physical server at home or any other cloud provider you choose. I've set mine up using a t2.small instance which will run me around $10 a month and has more than enough resources for my purposes.
To get started I created a new instance using the Ubuntu Server 16.04 image. If you use EC2 make sure during setup that you give the server enough space (I gave it a 40GB volume) and create a security group that ideally has port 22 (SSH), 80 (HTTP), 443 (HTTPS), 3000 (Gitea HTTP) exposed. Note that port 3000 is only required to initially configure Gitea and should be removed once that step is complete.
Now that we've got an Ubuntu server up and running let's ssh in, update the packages, and apply any upgrades:
sudo apt update
sudo apt upgrade
Next let's create a system user for Gitea to run under. We'll be creating a user named git whose home directory is located at /home/git.
sudo adduser --system --shell /bin/bash --group --disabled-password --home /home/git git
Note that we've created this user with --disabled-password indicating that this user cannot actually log in with a password, which makes sense since we'll just being using it to run Gitea.
Setting up PostgreSQL
Now that we've got an up to date ubuntu instance, let's set up a database for Gitea to use. This step is purely optional as Gitea does come bundled with a sqlite database, however I prefer to use an actual database so that I don't have to worry about possible performance bottlenecks down the road. For my database I chose to use PostgreSQL, although you could just as easily use MySQL/MariaDB.
To get started let's go ahead and install PostgreSQL:
sudo apt install postgresql
This will install and start PostgreSQL. Once that's done we can switch to the postgres user and use psql to log into the database server:
sudo su postgres
psql
Now that we're logged into the database server, we can create a user and database for Gitea to use:
CREATE USER gitea WITH PASSWORD '<password>';
CREATE DATABASE gitea OWNER gitea;
\q
This will create a user gitea that can log in with the password <password> (you should change this) and a database also named gitea.
Installing and Configuring Gitea
Now that we've setup our server and our database, let's go ahead and install Gitea using our git user:
sudo su git
cd /home/git
mkdir gitea
cd gitea
wget -O gitea https://dl.gitea.io/gitea/1.4.2/gitea-1.4.2-linux-amd64
chmod +x gitea
Note that at the time of writing the current version of Gitea is 1.4.2, you can check to see if there is a newer version available on the Gitea Releases page.
One of the great things about Gitea is the fact that it only requires a simple binary to run. We can start running Gitea on our server by simply running:
./gitea web
Now that we've started Gitea we can access it on port 3000 of our server. Upon opening Gitea in your browser for the first time, you should be greated with an initial configuration page. This configuration page should be fairly straight forward.
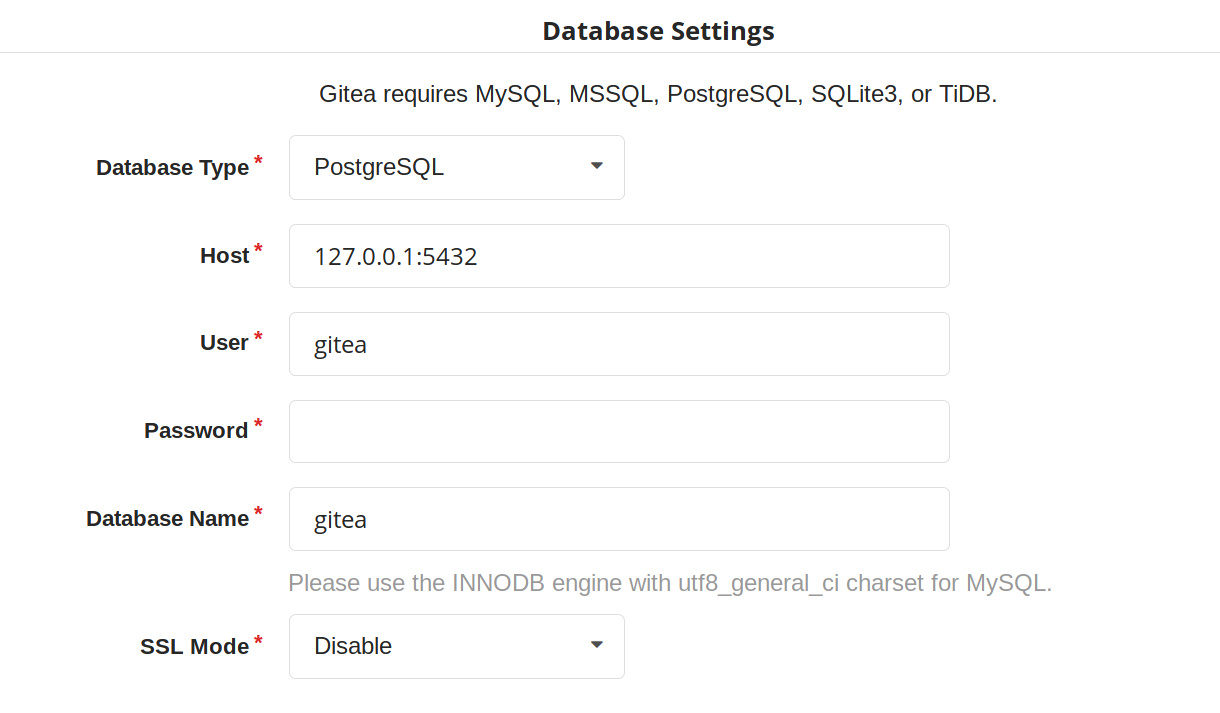
If you have been following this guide so far, the database settings section should be configured like this (with the password filled in):
The "General Application Settings" should be configured as:

Also, don't forgot to correctly set the 'Domain' and 'Application Url' to use the domain that you intend to host this server on. If you aren't using a custom domain, then just use the address of your server here. As for the rest of the settings you can leave them at the defaults or configure them if you like, although I would recommend setting up an admin account before moving forward.
Warning: I highly recommend checking the 'Disable Self-registration' box so that random people can't create accounts on your server.
Now that we've configured Gitea, feel free to kill the running process. We'll be adding a Systemd service shortly to handle starting and managing this process for us next.
Quick Note: If you are using EC2 to run this server, don't forget to remove access on port 3000.
Setting up a Systemd Service
Since we want to run Gitea as a daemon and not have to manually worry about starting it or ensuring that it's running, we're going to setup a Systemd service that will do it for us. We can do that by creating a service file:
sudo vim /etc/systemd/system/gitea.service
[Unit]
Description=Gitea (Git with a cup of tea)
After=syslog.target
After=network.target
After=postgresql.service

[Service]
RestartSec=2s
Type=simple
User=git
Group=git
WorkingDirectory=/home/git/gitea
ExecStart=/home/git/gitea/gitea web
Restart=always
Environment=USER=git HOME=/home/git

[Install]
WantedBy=multi-user.target
Note: that this unit file assumes your following this guide and using the git user.
Now all that's left to do is to enable and start the service:
sudo systemctl enable gitea.service
sudo systemctl start gitea.service
Easy peasy, now Gitea will automatically start when the server is restarted. Now let's move onto setting up Nginx.
Setting up Nginx
I'm a big fan of Nginx as it's a rock solid piece of software and as such I decided to use Nginx as a reverse proxy that performs SSL termination for the Gitea server. Gitea could just as easily be run with a different reverse proxy (such as Apache) or entirely standalone.
Let's go ahead and install Nginx:
sudo apt install nginx
Next let's go ahead and add an enabled site entry for Gitea by creating the following enabled site file:
sudo vim /etc/nginx/sites-enabled/gitea
server {
    listen 80;
    server_name <your-domain>;

    location / {
        proxy_pass http://localhost:3000;
    }

    proxy_set_header X-Real-IP $remote_addr;
}
Note that you should replace <your-domain> with the domain you plan to use to host your git server. For example I have mine at git.bryan.sh.
This sets up a listener that listens on port 80 and reverse proxies to the local port 3000 where Gitea will be running. Additionally we're adding the proxy_set_header here so that we can get accurate remote ip addresses in the Gitea logs which we'll use later for fail2ban.
Also, don't panic that we've only added a listener for port 80, we'll soon be using let's encrypt to create an SSL certificate and rewrite this listener to enforce HTTPS for all traffic.
Finally let's go ahead and remove the default enabled site and reload the configuration:
sudo rm /etc/nginx/sites-enabled/default
sudo service nginx reload
Once this is done, you should be able to manually start your Gitea server and visit it on port 80 to see the Gitea interface.
Setting up Fail2ban
In an effort to add a little extra security we're going to include Fail2ban to lock out users for a period 15 minutes if they have 10 or more failed login attempts within an hour. This is also an optional step, but I recommend not skipping it. To get started let's install Fail2ban:
sudo apt install fail2ban
Next we're going to create a filter that knows how to look for failed login attempts to Gitea by creating a filter:
sudo vim /etc/fail2ban/filter.d/gitea.conf
[Definition]
failregex =  .*Failed authentication attempt for .* from <HOST>
ignoreregex =
Then we're going to create a jail file that activates fail2ban for Gitea and uses our filter:
sudo vim /etc/fail2ban/jail.d/jail.local
[gitea]
enabled = true
port = http,https
filter = gitea
logpath = /home/git/gitea/log/gitea.log
maxretry = 10
findtime = 3600
bantime = 900
action = iptables-allports
Finally, we can restart the service so the changes take effect:
sudo service fail2ban restart
Now that we've defeated all the bad men, let us move on to adding HTTPS support.
Enabling HTTPS using Let's Encrypt
At this point in time, I'm assuming that you'll be using a custom hostname for your Gitea server and that you plan on securing it using SSL. If you do not plan on doing either of those things then you can skip this section, but I highly, highly recommend that you do secure your server with SSL. Before we get into this section, you need to make sure that you have your DNS properly configured and pointed to your Gitea server. If you don't know how to do this, I recommend checking your DNS provider's documentation.
To get started let's install Certbot:
sudo apt install software-properties-common
sudo add-apt-repository ppa:certbot/certbot
sudo apt update
sudo apt install python-certbot-nginx
Next let's use Certbot to provision the certificant and update the Nginx listener:
sudo certbot --nginx
The prompts should be straight forward to answer, and I recommend answering yes to letting Certbot update your Nginx listener to forward all HTTP traffic to HTTPS.
Assuming that DNS is configured properly and the Nginx listener server name matches your domain, then Certbot should successfully have provisioned your certificate. In which case, hooray! You should now be able to access your server via it's hostname over HTTPS.
We're not quite done yet though, we need to setup a Systemd timer to periodically renew your certificates.
Setting Automatic Certificate Renewal
Now that we're up and running with SSL, we need to periodically maintain our certificates. Luckily Certbot makes this very easy to do and we can simply create a Systemd timer to do it for us.
First let's create a service to renew the certificate:
sudo vim /etc/systemd/system/certbot-renewal.service
[Unit]
Description=Certbot Renewal

[Service]
ExecStart=/usr/bin/certbot renew
Next we need to create a timer that will run the renewal service daily:
sudo vim /etc/systemd/system/certbot-renewal.timer
[Unit]
Description=Timer for Certbot Renewal

[Timer]
OnBootSec=300
OnUnitActiveSec=1d

[Install]
WantedBy=multi-user.target
Once that's done we just need to start and enable the timer:
sudo systemctl enable certbot-renewal.timer
sudo systemctl start certbot-renewal.timer
And that's it, our certificates will remain up to date until the end of time (or we forget to pay our renewal fee).
Enabling Git Over SSH
Finally, we're in the home stretch. All we need to do now is have Gitea overwrite the authorized keys file for the Git user. This can simply be done by visiting the admin panel for the Gitea server (https://<your-server>/admin) and clicking the "Run" button to rewrite the '.ssh/authorized_keys' file:

This will allow Gitea to be used via Git over SSH.
Conclusion
And there you have it, a fully functioning self-hosted Gitea server. You should now be able to fully manage your own repositories, create mirrors, add users, or whatever else you like. I recommend checking out the Gitea Docs if you need help from here. A few things that I did not include in this guide are producing automated backups to S3 (I may create a followup post on this) and Email configuration. Anyways, I hope you found this guide useful, thanks for reading!